Ways to Set the License Server Options
On Windows, you can use any of the following methods to set the license
server configuration options:
Notes:
- The options set through
the system services (method 1) have the highest priority vis-a-vis other
methods—followed by options set through the registry entry (method 2)
and finally the LSERVOPTS environment variable (method 3).
- The options set through
the system services (method 1) are temporary; the remaining two methods
are permanent.
- If full file pathnames
are not specified while configuring the license server options, then the
files will be created under the /System32
directory, by default (applies to Windows Vista and Server 2008 as well).
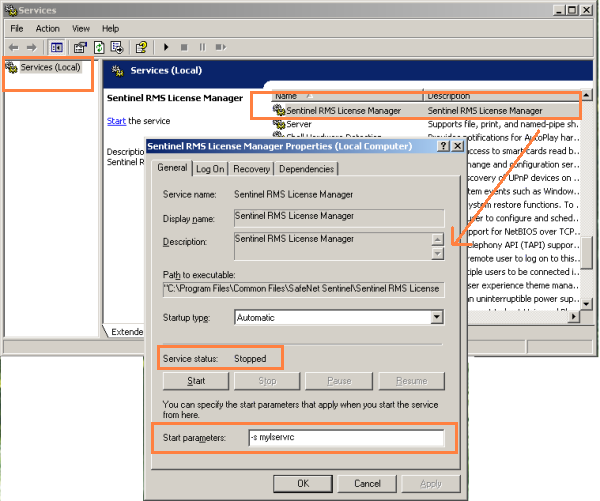
Method 1 - Using the Windows System Services Console
On a supported Windows system, use the following steps:
- From the Start menu, point to Settings
> Control Panel.
- Double-click
Administrative Tools.
- Double-click
Services.
- In the Services window, locate Sentinel
RMS Development Kit License Manager and double-click it.
- Stop the license
server (service, if running already).
- Set the parameter(s)
in Start Parameters. For example,
-s mylicensefile -l myusage.log -f mytrace.log -tr 7 will have the following
result:
- mylicensefile will be
searched by the application for the license code. Any new licenses added
to the RMS license server will be added to this license file.
- myusage.log will be created
containing all the license server usage information (such as, the license
server start, shutdown, license request, and license release).
- mytrace.log will be created
containing the license server trace logs. Level 7 enables the functions,
keys, and errors trace logs.
Note: The Windows
Service Controller ignores the double quotes (“ ”). So, do not use double
quotes while setting options, else these will be ignored. For example,
if you specify -f aa"aa, then it will be interpreted as -f
aaaa.
- Start the license
server after providing the settings.
See the screen-shot below for an example.
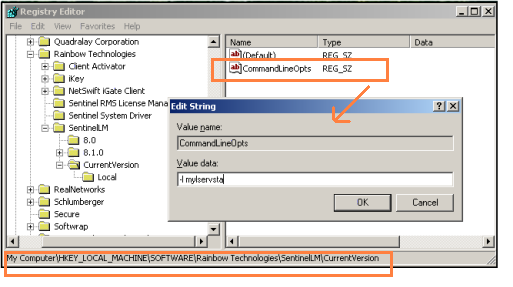
Method 2 - Using the System Registry (Command-line Options)
In the Windows Registry Editor, create/update the value of "CommandLineOpts”
under the following registry key: HKEY_LOCAL_MACHINE\SOFTWARE\Rainbow
Technologies\SentinelLM\CurrentVersion.
See the screenshot below for an example:
Method 3 - Using the LSERVOPTS Environment Variable
See Setting Environment
Variables
Open topic with navigation