Note: If your vendor provided you a Computer ID key. This key must be installed before you can produce a locking code.
An application or license server may be restricted to operate on certain computers. These restrictions are included in the license codes when they are created.
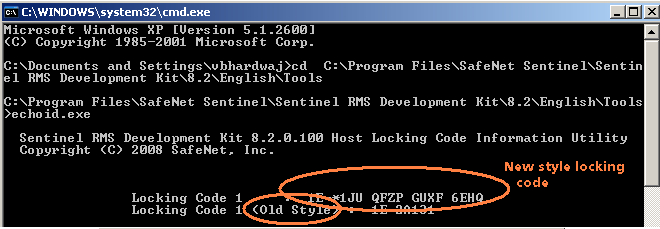
Before your vendor creates a license code with any computer restrictions, you must get the locking code for your computer with the echoid program. Your vendor will tell you which computers you must run echoid on. The echoid utility outputs either one or two hexadecimal locking codes depending upon how your vendor has configured it. You will send all locking information to your vendor. Your vendor will use this information, which is specific to your computers, to generate new license codes.
The echoid options are:
| Option | Description |
|---|---|
|
-d |
Display detailed information about available/selected locking criteria. |
|
-p |
Pauses the utility and then shows the output in another console. Only for Windows Vista and Server 2008. |
|
-h |
Displays the help. |
Echoid sends the output to a console window. By default, you can send new style locking code to your vendor, unless you have been asked to send the old style locking code.
You can generate the locking code on a Windows computer by saying:
echoid >lock.txt
sends the locking code data to a text file named lock.txt in the directory from which you used echoid.
Echoid can be run on Windows 2000, Server 2003, XP, Vista, Server 2008, and UNIX. It can be executed from the operating system command prompt by an administrative or application user on a stand-alone, client, or license server computer.
The file echoid.dat must be in the same directory as the echoid program file. This file defines what criteria will make up the fingerprint and is shipped along with echoid.exe.
Wechoid is the windows interface of echoid (see the screenshot below). Here are few notes to understand its interface:
You need to pass the locking data value (both the lock selector and locking data) to your vendor/developer.
Again, you can send new style locking code to your vendor, unless you have been asked to send the old style locking code.
To copy the lock selector, place the cursor in the Selector field and then drag your mouse to highlight it. Copy it using the short-cut menu shown on right-click. Similarly, copy the data from the Code field.
We would recommend you to use wechoid as it is more simple and easy to use.
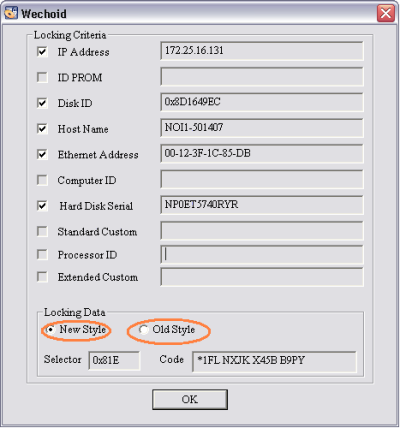
Wechoid (Windows-based Graphical Utility to Obtain Fingerprints)